Part I Achieving great aeration results and Part II Silo recirculation as an aid to fumigation
Author: Philip Burrill, DAF Qld. | Date: 20 Jul 2016
Take home message
- Seek advice to ensure the right size aeration fans and associated equipment are fitted – ducting, roof vents and fan controller. Not all silo suppliers get it right.
- Recommended aeration cooling airflow rates are 2 to 4 litres of air per second, per tonne (L/s/t). Do your aeration fans achieve this when your silos are full of wheat, barley, chickpeas, sorghum, canola?
- Are you achieving the target ‘grain temperatures’ of 18° to 23°C during summer storage and less than 15°C during the winter period?
- Aeration maintenance: farm case studies show that aeration equipment checks and maintenance can lead to a significant improvement to aeration performance and grain storage results.
- Recirculate air with a small fan during fumigation in a sealed silo (150 – 2000 tonnes) ensures rapid, uniform distributes of phosphine gas. Otherwise it can take 2 – 5 days for gas to reach all areas inside a silo.
Storage best practice – four key steps
Aeration cooling is just one of four key best practice strategies that provide good results for on farm storage. When combined, they form the foundation for successful storage and importantly, a grower can build a reputation as a reliable supplier of quality grain.
- Aeration: correctly designed and managed, will provide cool grain temperatures and uniform grain moisture conditions. The result is reduced problems with grain moulds and insect pests in storage, plus the ability to maintain grain quality attributes such as germination, pulse seed colour, oil quality and flour quality.
- Hygiene: a good standard of storage facility hygiene is crucial in keeping storage pest numbers to a minimum and reducing the risk of grain contamination.
- Monitoring: monthly checking of grain in storage for insect pests (sieving / trapping) and at the same time inspect grain quality and temperature. Keep a monthly storage record to record these details, including any grain treatments you applied.
- Fumigation: in Australia we now only have gases (fumigation) to deal with insect pest infestations in stored grain. To achieve effective fumigations the storage/silo must be sealable – gas-tight (AS2628) to hold the gas concentration for the required time.
Effective aeration – what does it look like?
For the summer storage period November to April we aim to achieve grain temperatures of 18° to 23°C with well managed aeration cooling. For the winter period May to September the target is grain temperatures of less than 15°C.
Push a robust thermometer attached securely to a broom handle, or better, a purpose built grain temperature probe one meter into grain. Leave for a few minutes in grain before reading to see what grain temperature your aeration system has achieved.
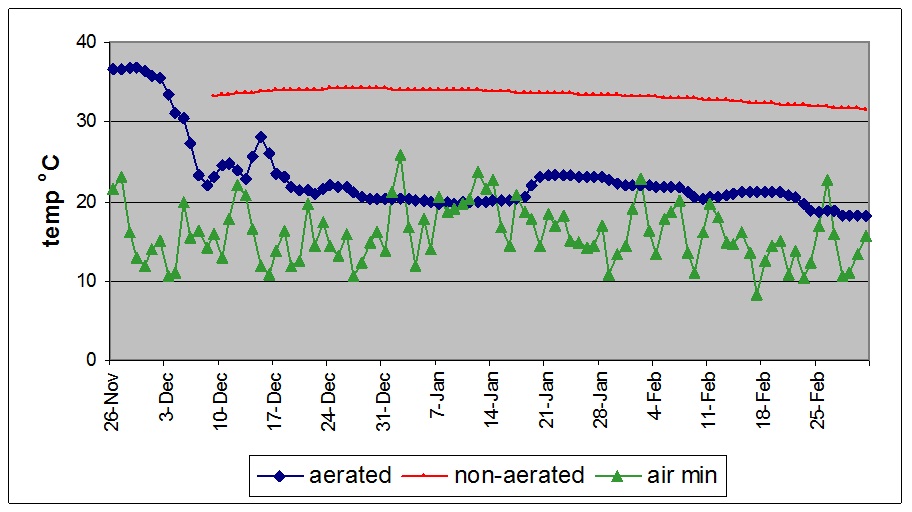
Figure 1. Two silos -wheat. Non-aerated silo had grain temperature sit above 30°C for 3 months, ideal for insect breeding. Well managed aeration in summer brings temperatures down towards 20°C.
Aeration - achieving good results
There are three areas to focus on for good aeration results:
- Aeration equipment for the job
- Operating aeration system effectively
- Maintaining / checking the equipment is doing the job
a. Aeration equipment for the job
The three main components are fans, ducting inside the storage and the roof vents.
Fan selection: Fan size, number per silo and type of fan are common areas for confusion. It usually requires an “experienced grain aeration specialist” to provide advice to either the silo manufacturer / supplier, or directly to the grower. There are a number of important considerations to consider before fitting fans to a silo or storage.
Silo size - height & width, electricity supply available at site, grain types stored, typical harvest grain moisture contents, and what is the intended purpose of fans? Is it only for aeration cooling (2 - 4 L/s/t) , or do you want to set up one or two silos with much larger airflows (15 - 25 L/s/t) for the purpose of aeration drying?
These details can be quickly sorted out with one or two phone calls, when you are dealing with an experienced aeration specialist. It is vital that the right questions are asked. The result, the fan selection, ducting and venting design suits the intended purpose for your grain storage situation.
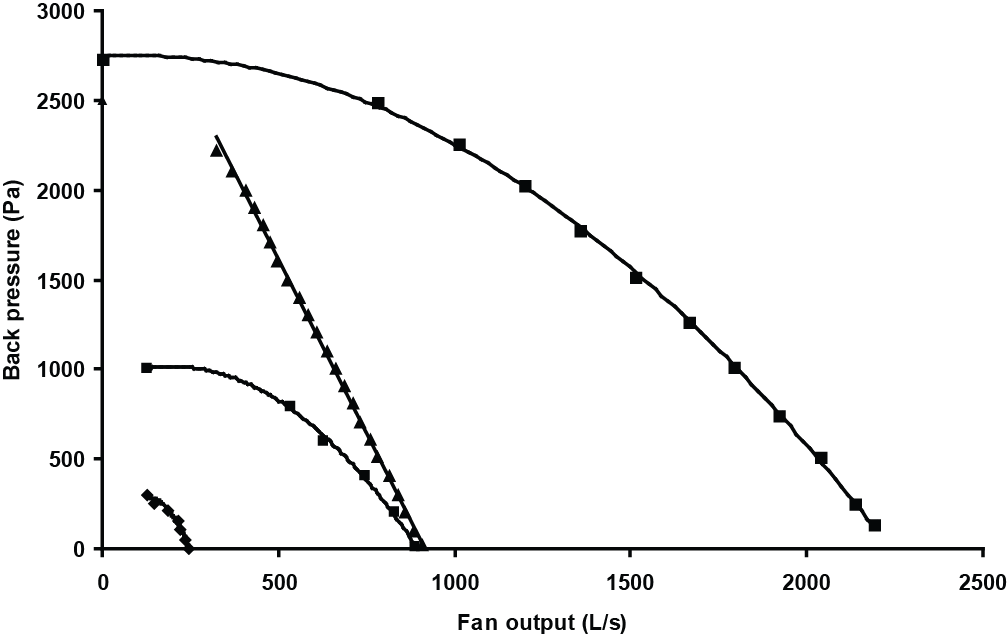
Figure 2. Note the large variation in aeration fan ouputs for four typical fans fitted to grain storages
Farm case study 1: A 130 tonne capacity cone based silo, nearly full with 105 tonnes of barley, fitted with one 0.37 kW aeration fan was tested for airflow output. Using the ‘A-Flow’ testing device (GRDC fact sheet, “Performance testing aeration systems”) the single aeration fan was only able to generate 166 litres of air per second, or 1.6 L/s/t airflow against the 105 tonnes barley. Result: grower decided to fit a second fan (same size) on the opposite side, aiming for 3.0 L/s/t
Farm case study 2: Two Grainmaster™ 150 tonne capacity cone based silos, both fitted with a pair of 0.37 kW Agrdry F100 aeration fans. One silo was full with 140 tonnes of Soybeans and the other silo full with 150 tonnes of White French millet. With identical fans running on identical silos the total airflow output through the soybeans was 397 L/s, providing a useful 2.8 L/s/t. However airflow going into the White French millet silo was only a total of 141 L/s, providing a much lower 0.9 L/s/t. The extra back pressure on fans created by the small seed millet was reducing aeration airflow to well below the recommended cooling range of 2 – 4 L/s/t.
Ducting inside silo: There are two common types, the round tube ducting that can be made to lift up for cleaning, or the house shaped ducting that is fixed down to the cone base. Ducting length, strength, location in silo and size of perforation holes / slots, are all involved in achieving optimum airflows through grain. Ability to clean and remove grain residues from ducting for silo hygiene is important for both cone base or flat bottom silos.
Roof vents: Vents can be as simple as a “Chinaman hat style” used on the centre fill top hatch, or the many variations of “goose neck” roof vents. Unfortunately it is not uncommon to see venting design problems on range of silo brands.
The vent size / area needs to be appropriate to suit the fan output. A fan’s airflow should not be used at start up to lift heavy vent lids, or constantly work against lid springs. This ensures fan airflow is not restricted. For all sealable silos, vents require simple, effective systems for creating a gas tight seal during fumigation. Do you also have easy access to vents for maintenance on rubber seal?
Farm case study 3: Three new 150 tonne capacity, sealable, aerated silos, each fitted with two 0.37 kW Downfield F370 aeration fans (smallest curve on Fig. 2 is the F370 fan). The storage facility manager was concerned about fan output after he tested fans shortly after the silos construction was completed. He was comparing the operating sound of fans running using the four vents fitted to the roof, with the fan’s sound when he also manually opened the centre top fill hatch as well. The fan performance sounded like it improved with the extra vent space provided.
When fan output was tested (A-Flow device) on the ‘empty’ (no grain back pressure) new silo, the pair of F370 fans could only achieve a total of 209 L/s airflow with the four vents used as designed. When the centre top fill lid was also opened, output immediately increased to 517 L/s.
On closer inspection the 4 sealable vents on the roof had no system to hold them open during aeration. There was only a long flexible cable to pull them closed / sealed for silo fumigations. Fans were losing more than half their unloaded performance, just by forcing them to lift four steel plate vent lids. Result: when the silo manufacturer was made aware of the design problem they arranged to fit a simple vent lid lifter.
Access to four vents around the roof edge to maintain rubber seals, is the next design challenge.
b. Operating aeration system effectively
Running the fan at the right times will achieve cool grain temperatures and uniform moistures. Aeration cooling aims to push through a series of ‘cooling fronts’ starting from the base of the silo.
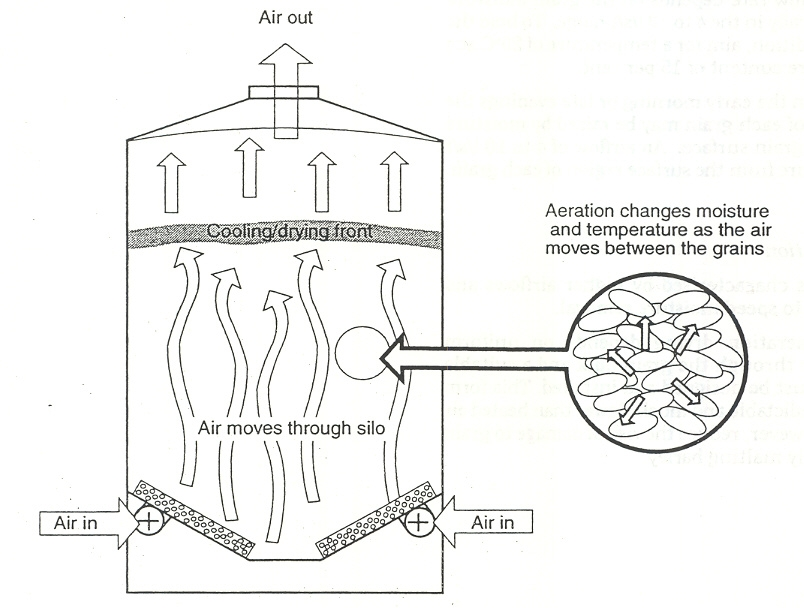
Figure 3. Cooling / drying fronts in the aeration process (C. Newman Agric. WA).
While there are a number of producers still manually operating aeration fans, for most storage facilities we recommend using a good quality automatic aeration controller with a sensor measuring both ambient air temperature and humidity to automatically turn on fans at optimum times.
Manual operation of fans
There are three stages when operating aeration cooling fans from the start of harvest:
- As soon as enough grain covers the ducting, turn on aeration fans while filling silo. Run continuously (24hrs / day) until the first cooling front comes through the full grain depth. This usually takes 3 - 5 days. If safe, go to the top of the silo and see if the air coming out has changed from a warm, humid smell to a fresh, cool smell. The first cooling front is through. See Fig 3.
- Once this has occurred, run the fans for approximately 12 hours per day for the next 5 – 7 days. Select the cooler night air, but avoid extended periods of high humidity air which may wet grain. Avoid fog, misty or showery conditions.
- Check the grain temperature and condition. Grain temperature in summer should now be close to 20°C. The longer term “protect” phase now begins. Operate fan for approx. 100 hours per month, selecting cool, mostly dry air from 3 - 5 days per week to maintain cool grain conditions. An automatic controller will usually be much more reliable at this task.
Automatic controller operation of fans
Today there are automatic aeration controllers available that automatically step through the three stages outlined above.
Seek independent advice as to what are the better quality controllers to consider, as there are poor quality units that may put your stored grain at risk. Ensure the supplier has a good reputation for providing after sales support and parts if required.
For a new unit fitted to a storage facility, there is simple start up process to follow. See manual, or consult supplier. As a general rule, leave the auto controller itself powered up. It is recording a history of current weather conditions so it is able to turn fans on at the optimum times.
c. Maintaining and checking aeration equipment
There are a few basic checks and maintenance steps to ensure your system is doing the job.
- Check grain temperatures to see if you are achieving the target temperatures of 18° to 23°C during summer storage and less than 15°C during the winter period.
- See Fig. 4 where an OPI® cable was used in the aerated barley silo (“Farm case study 1”) to record grain temperatures at various depths. This helped identify the low airflow problem.
- When checking silos each month for insects, also look at the hour meter on the aeration auto controller to see if fans are averaging approx. 100 hours per month (+/- 20 hrs).
- At least once per year use a good quality thermometer and relative humidity reader to check the aeration auto controller’s sensor has not been damaged and is readings correctly.
- Manually test-run fans on silos to check they are all operating. Clean fans if required.
Farm case study 4: A ten minute fan cleaning job can produce large improvements. A single 0.37 kW aeration fan was tested for airflow output on a 128 tonne capacity coned based silo holding 105 tonnes of barley. It was observed that the fan impeller had a significant build-up of dust on the blades prior to testing. Using the ‘A-Flow’ testing device, the aeration fan output was recorded as 86 L/s, or 0.8 L/s/t airflow against the 105 tonnes barley. After cleaning the dust from the blades the fan was retested and produced an output of 152 L/s, or 1.5 L/s/t. Result: grower cleaned remaining fans.
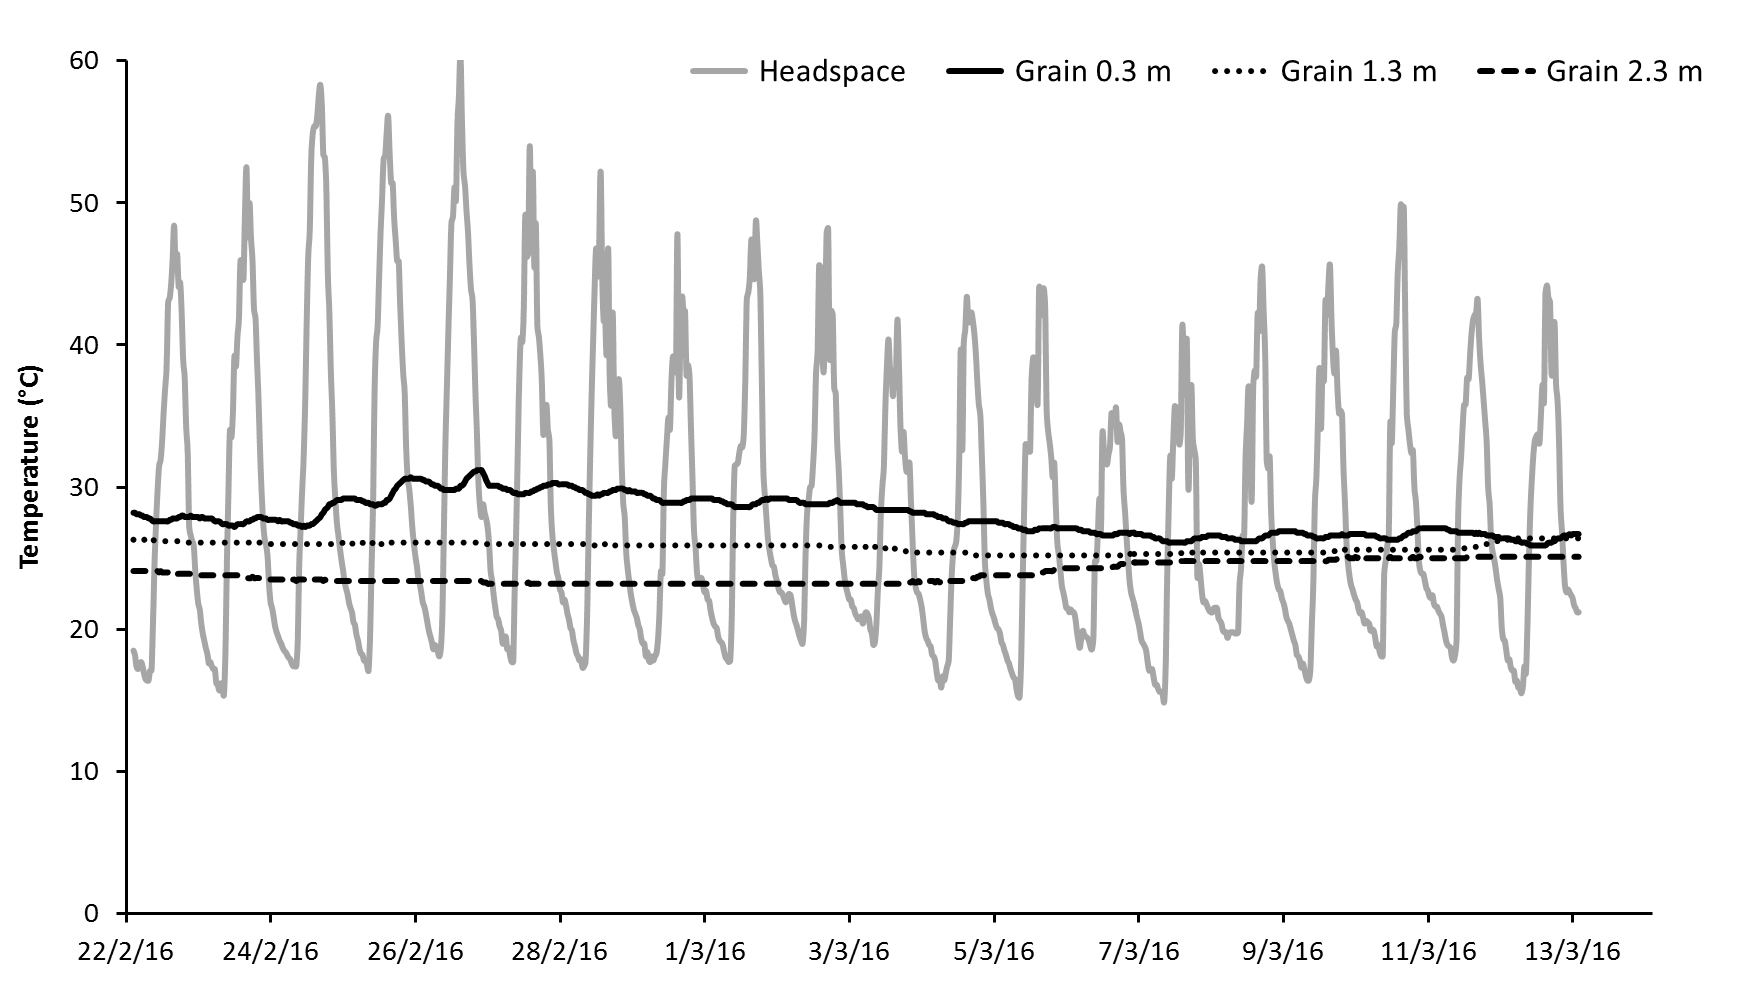
Figure 4. Temperatures in a silo of barley, in headspace and at three grain depths. The warmer than expected grain temperatures indicated possible aeration problems. See Farm Case study 1.
Silo Recirculation – how can it help with fumigation?
Australia now only has gases to control live insect pests in infested grain. Dichlorvos spray on insecticide is no longer registered for this use. To achieve effective fumigations, silos must be pressure tested to check they are sealed – gas-tight. This ensures they hold high gas concentrations for the required time to kill pests.
Silos pressure tests can be carried out by using a short burst (5 – 10 sec.) of the aeration fan, or a portable leaf blower to initially pressurise the silo for the test. The pressure decay (250 to 125 Pa) can timed by using the silo’s relief valves, a length of 20 mm clear plastic tube in a “U” shape with water in it (manometer), or a digital manometer connected to the silo. See GRDC Fact Sheet : “Pressure testing sealable silos”. http://storedgrain.com.au/pressure-testing/
During fumigation, phosphine gas is typically liberated over 5 or 6 days from the tablets or blankets that have been placed in the silo. This gas however only moves slowly, taking about 24 hours to travel 6 meters through grain.
If you are fumigating a medium to large silo (150 – 2000 tonne silo) the gas may take 2 – 5 days to eventually arrive in all parts of the silo. In large silo fumigations this may result in some grain, at the furthest distance from tablets, only getting 6 days of phosphine gas instead of the required 10 days or longer exposure period. Six days is not enough time to kill all the life cycle stages of the pests.
A typical phosphine fumigation required to kill all pests is a minimum of 200 ppm phosphine gas concentration for at least 10 days. See horizontal blue line in Figure 5 below.
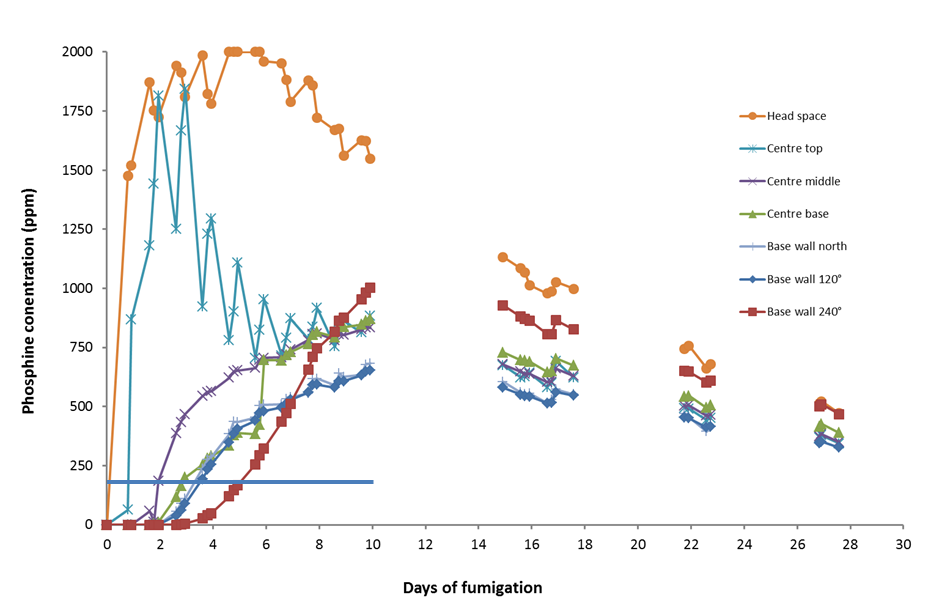
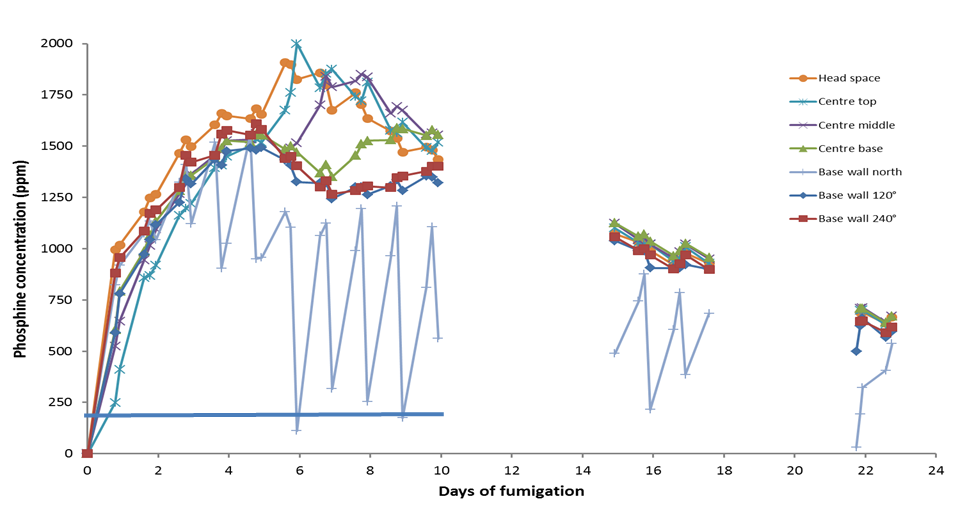
Figure 6. Phosphine gas concentations in a silo (1423 t wheat) where a small fan was used to draw gas from blankets in the silo headspace and pump it to the silo base via aeration ducts for the first 5 days of fumigation. Gas concentration in all areas of the silo reached over 800 ppm within the first 24 hrs.
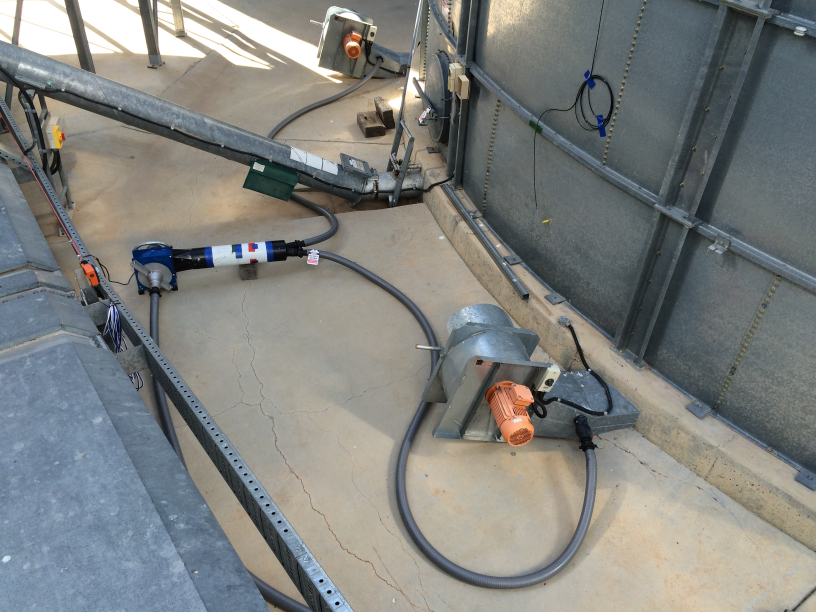
Figure 7. A small fan (F370 – 0.37 kW) used during the first 5 days of fumigation to recircualte phosphine to give rapid uniform gas distribution in 1423 tonnes wheat. See Figure 6.
Options for fumigation recirculation
For all fumigation recirculation systems, the sealable silo needs to be gas – tight so there is no gas leakage during the fumigation. Fig. 6, “Base wall north” shows the impact of a leak at the silo manhole which causing large daily fluctuations in gas concentrations.
a) Phosphine blankets or tablets can be placed in the ‘silo headspace’ along with a small fan connected to the headspace via 90 mm pipe plumbing coming down the silo wall from the roof. Phosphine gas is drawn from the headspace and pumped into the base of the silo via both aeration ducts. See Fig. 7
b) For ground level application of tablets or blankets, a sealable ‘phosphine box’ can be plumbed into this system, either a moveable box, or mounted permanently on each silo.
c) Using a fan to force the phosphine gas movement around in silos during fumigation is generally recommended, rather than relying on a passive ‘thermosiphon’ approach. For medium and large silo fumigations, 150 tonnes plus, or silos storing smaller grain sizes (e.g. millets, canola, lentils etc.) that reduces air movement, fan force recirculation rather than thermosiphon is advised. Fan forced recirculation may also assist where the grain type (e.g. oilseeds) typically absorbs higher amounts of phosphine during fumigation.
Equipment for fumigation recirculation
- Sealable silo - gas tight, that passes pressure test
- Plumbing pipes (90 – 100 mm) from silo roof to ground level. Use quality pipe, fittings and seals that will ensure many years of safe, gas- tight fumigations
- Small fan (e.g. Downfield F370 - 0.37 kW) to recirculate air. In most case this fan size will be suitable for both small & large silos. In trials (Fig. 6 & 7) this fan size provided a complete silo air change every 12 hours for the full silo holding 1420 tonnes of wheat
- Fittings for fan intake and outlet. Flexible hoses (50 – 100mm) couplings and gate valves
Fumigation recirculation - operations
- Pressure test the silo to check for leaks
- Follow all label directions and place tablets / blankets in the ‘headspace’ or ‘phosphine box’.
- Run small recirculation fan for first 5 days of fumigation. Leave silo sealed for remaining days of fumigation expose period as label requires (e.g. 7, 10, 20 days).
Note: There are benefits to using the silo ‘headspace’ to locate the blankets or tablets. The large surface area of grain in the headspace provides safe, large easy access for gas penetration and diffusion into the grain.
Warning
Always seek reliable advice before fitting fumigation recirculation systems to silos / storages. Some systems that are currently sold are not recommended because of unsafe design features. Phosphine is not only a toxic gas, but can be flammable and explosive if restricted in a small area or used in a manner that causes gas concentrations to rise quickly to high levels.
Follow label directions and seek advice.
Further reading
- GRDG Factsheet – “Performance testing aeration systems”
http://storedgrain.com.au/testing-aeration/ - GRDC Fact Sheet – “Safe storage of Sunflower seed – aeration drying and cooling”
http://storedgrain.com.au/safe-storage-sunflower-seed/ - GRDC Update – “How Aeration Works”
http://storedgrain.com.au/how-aeration-works-grdc-update/ - GRDC booklet – Aeration stored Grain – cooling or drying for quality control
http://storedgrain.com.au/aerating-stored-grain/
Acknowledgements
The research undertaken is made possible by the significant contributions of growers through both trial cooperation and support of GRDC, DAF Postharvest research team and GRDC’s national grain storage extension team, the author would like to thank them for their continued support.
Contact details
Philip Burrill
Department of Agriculture & Fisheries, AgriScience Qld.
Hermitage research facility, 604 Yangan road, Warwick Qld. 4370
Mb: 0427 696 500
Email: philip.burrill@daf.qld.gov.au
GRDC Project Code: PRB00001,
Was this page helpful?
YOUR FEEDBACK