Mouse Control
Mouse control is now a year-round activity
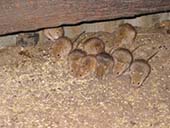
Until recently, explosions in mouse populations in grain-growing areas were often followed by population crashes and consecutive years of little activity and damage.
However, mice now appear to have become a more persistent problem with base populations carrying over from one year to the next, particularly in parts of the southern and northern cropping regions.
It is believed current farming systems (ie, no-till, stubble retention) could be contributing to mice becoming an annual, rather than cyclical, problem.
The Grains Research and Development Corporation (GRDC) recognises the enormity of the mouse problem and the severe impact it has on growers’ businesses, their families, their communities and the broader industry.
In response to the increasing prevalence of mice in many key grain-growing regions of Australia, the GRDC is injecting a further $4.1 million into mouse control research, development and extension (RD&E) initiatives.
The three key investments, to be led by CSIRO, will focus on understanding mouse ecology, biology and management, increasing surveillance, and mouse feeding preferences.
The GRDC is committed to exploring all options in an effort to provide growers with better mouse control solutions. In addition to the new investments, the GRDC continues to support a wide range of other ongoing mouse-related RD&E.
More information about the GRDC investments can be found here.
Mouse Monitoring – Latest National Report
This page provides practical information for growers and advisers and links to other useful resources.
Five quick tips for mouse control:
- Apply broad scale zinc phosphide bait: According to the label, at the prescribed rate of 1kg/ha.
- Apply bait at seeding or within 24 hours: While seed is still covered by soil increasing the likelihood of mice taking the bait, prior to finding the seed. Rebait through the season as needed.
- Timing is critical: Delays of 4-5 days in baiting after seeding can give mice time to find crop seed. High populations can cause up to 5% damage each night.
- Monitor paddocks: Check paddocks regularly and update local data using the MouseAlert website.
- After harvest and prior to sowing – minimise sources of food and shelter: Control weeds and volunteer crops along fence lines, clean up residual grain by grazing or rolling stubbles.
Practical tips on baiting set-up
Equipment options for spreading mouse bait
Mouse baiting with zinc phosphide-coated bait should be conducted as soon as practical after seeding to maximise efficacy and minimise crop damage.
There are a number of different approaches growers can take when it comes to spreading mouse bait, depending on the equipment they have.
Air commodity cart
In some instances, growers may opt to spread mouse bait at the time of seeding, using the small seeds box of their air commodity cart for metering the bait, and using a dedicated primary air line for distribution. Using a dedicated primary air line for bait distribution ensures the uniformity of seed and fertiliser across the seeding bar is not impacted.
The small seeds box or small seed meter rollers are often used because the bait application rate of one kilogram per hectare is low.
Dispersion of bait using this method is usually via secondary air lines on to dispersion plates at the back of the bar, which, depending on mounting height, spread the bait uniformly over a series of two to three metre bands across the width of the seeding bar.
Alternatively, for tow-behind air cart configurations, growers have fitted custom plumbing to redirect the air flow and distribution spouts (for example, the Racol super spout) to blow the metered bait out across a working swath.
12-volt broadcast
Using a single spinner attached to a 12-volt motor, these broadcast spreaders can be mounted to a vehicle, quad-bike or tractor. Hopper capacity is between 30 and 100 litres.
Typically spreading mouse bait to about 24m, the 12-volt broadcast spreaders use a choke to adjust the flow of bait on to the spinner. While some designs use the spinner rotation to meter bait through the choke, others have a choke shut-off so the spinner can continue to rotate and a door starts or stops the flow of bait to the spinner.
Conventional spreaders
Linkage and trailing spreaders can also be used to spread mouse bait. Because these spreaders generally use two large spinner discs, bait can be spread to around 36m.
The primary challenge with using these larger spreaders is achieving the very low baiting rate of 1kg/ha.
Some linkage and trailing spreaders with scales and computer-controlled metering chokes have settings for small seeds which may deliver a 1kg/ha rate.
Belt-style spreaders may require a very low door setting and slow belt speeds to achieve 1kg/ha and some models may require the metering door width to be modified. A piece of stiff rubber fixed to the metering door with slots cut in it can be used to choke down the width of metered product.
Grower innovations
Growers have also spent time in the workshop building and modifying equipment for spreading mouse bait. These include using conventional belt spreaders to carry a mouse bait hopper in the bin with other product. The bait hopper is fitted with a separate metering door and bait spreader plates, allowing bait to be spread concurrently and thereby saving a working pass.
Spreading mouse bait – rates and coverage

According to label information, mouse baiting with zinc phosphide-coated bait should see one kilogram per hectare applied across the paddock, excluding a 50 metre buffer zone to the edge of the crop and any native vegetation.
1kg/ha equates to around 2-3 bait seeds per square metre.
According to CSIRO experts, distribution should be as uniform as practical but the key is ensuring ensuring swaths no larger than 12m are unbaited. Because mice will move around the paddock to feed, they will inevitably pick up bait if this guideline is adhered to.
Distribution
Spreading bait using a 12-volt broadcast spreader will generally see bait spread to around 24m.
For example, if spreading behind a 12.2m seeding bar, meter the rate for the working swath width (not the spread width), i.e. 12.2m coverage. Although the 12-volt spreader will be spreading bait beyond 12.2m, consecutive swaths either side will even out the coverage across the paddock just as it does when spreading fertiliser or lime.
But for operations with wider working swaths than the width of bait spread, the shortfall limit is 6m. As an example, a 12-volt spreader casting bait across a 24m wide bout, the maximum effective swath width is 30m. This means there will be no bait spread in a 12m swath between consecutive swaths.
By this reasoning, a 12-volt spreader spreading bait to 24m would not be suitable for use with a 36m boom-spray. The minimum effective spread required for a 36m boom swath would be 30m.
Spreading mouse bait – 12-volt spreader calibration - part 1 Adjusting the choke
Calibrating a 12-volt spreader requires a level of iteration – a process where settings are made, tested and then adjusted repeatedly until the desired application rate is achieved.
Adjusting the choke
The best place to start when calibrating a 12-volt spreader for mouse bait is the manual. In most cases, a series of guideline application rates are given with corresponding equipment hardware and choke settings.
Start by making these hardware and choke settings to match the intended bait application rate of one kilogram per hectare. For some 12-volt spreaders, some approximation may be needed as guides will not be given for rates as low as 1kg/ha.
For example, a C-Dax Slugmaster 12-volt spreader lists a choke setting of 1 for an application of 2.5kg/ha at 12 kilometres/hour as the lowest setting. For a seeding scenario at a fixed speed, for example 10km/h, a choke setting slightly under 1 is a good place to start.
If spreading at a higher speed, for example 30km/h, setting 1 or slightly higher would likely be a good initial calibration setting.
Spreading mouse bait – 12-volt spreader calibration - part 2 Spreader calibration
Spreader calibration
Measure 500 grams (g) of mouse bait using some accurate scales and load it into the hopper of the 12-volt spreader.
Option 1 – fixed operation speed and swath; adjust choke
This option is useful if spreading bait, for example, with the bait spreader mounted to the seeding bar or air commodity cart. In this scenario, the desired operation speed is known and seeder bar swath width is fixed.
After putting 500g of product into the hopper in a paddock where bait is to be spread, get up to the desired operating speed, start the spinner running and open any shutter needed to start bait flow.
Measure the distance the bait is to be spread and using the operating swath width, calculate the application rate:
Remember, the target is 1kg/ha, so make small adjustments to the choke and repeat the process until as close as practical to this figure.
It may be useful to make adjustments to the choke based on the target distance to be travelled for the given swath width and operating speed. This can be calculated as follows:
As an example, if seeding on a 12.2m swath, the target distance travelled for 500g of bait through the spinner is just over 400m.
If unable to adjust the choke to a suitably low setting to achieve the 1kg/ha application rate, it may be necessary to increase operating swath width. In a seeding scenario, this might mean that bait is only spread on every second swath, effectively doubling the working width to 24m for the above calculations.
Option 2 – Fixed choke and swath width; adjust spreading speed
Where spreading speed can be adjusted, start the spinner and open the shutter. Use a stopwatch to measure the time taken for the 500g of bait to run through the machine.
Note the bait spread width and ensure it extends across the intended operating swath width. Unbaited strips should not exceed 12m in width, so ensure the spreader is capable of spreading wide enough for the intended swath width, or alternatively, alter the swath width to match the spreader.
Using the time measured for the 500g of bait to feed through the spreader, calculate the required operating speed at that choke setting:
As an example, if spreading on 24m swath widths and recording a time measurement of 20 seconds for 500g to flow through the spreader, our target speed is 37.5km/h.
Checks and variations
Operators may find bait flows at different rates when the hopper is near full or near empty, or between bait batches. Regularly measure the weight of bait when filling the hopper and calculate the area covered, making adjustments to choke settings or travel speed as required.
Residue build-up can occur with some bait. Look for residue build-up on the spinner or metering choke and clean as required to prevent this build-up impacting application rates or spread.
Spreading mouse bait – Calibrating conventional linkage and trailing units
Spreading mouse bait at the label rate of one kilogram per hectare can be challenging when using a trailing or linkage spreader, given the lower rate required compared to the typical application rates these spreaders are used for.
In most cases, a 36 metre swath width can be achieved using a modern linkage or trailing spreader. This can often match with sprayer swath widths.
Auto-calibration spreaders
Some automatic calibration machines with integrated weigh scales may be programed for the desired 1kg/ha application rate using a small seed setting on the controller.
Manual calibration spreaders
For manual set machines, an operator’s manual may provide detail or an indication as to the required choke or door settings for spreading at 1kg/ha.
Manual calibration usually involves setting the choke or door height setting, removing one of the spinners and capturing the material in a calibration bucket over a set time or travel distance.
Material captured in the bucket can then be weighed and with the known time or travel distance, an application rate can be calculated.
Travel distance measured:
Timed weight measured:
Speed, metering door height or choke settings onto the spinner can be adjusted to meet the 1kg/ha bait application rate.
Ground-drive belt trailing spreaders may require modification to the metering door to achieve 1kg/ha application. Some growers have fixed stiff rubber belting to the door with a metering slot cut in it, effectively narrowing the door opening width and choking down the flow of bait to the spinners.
Checks and variations
Operators may find bait flows at different rates when the hopper is near full or near empty, or between bait batches. Regularly measure the weight of bait when filling the hopper and calculate the area covered, making adjustments to choke settings or travel speed as required.
Residue build-up can occur with some bait. Look for residue build-up on the spinner or metering choke and clean as required to prevent this build-up impacting application rates or spread.
Spreading mouse bait – PPE, clean-up and storage
According to label information, when baiting with zinc phosphide, appropriate Personal Protective Equipment (PPE) needs to be worn to protect the operator.
PVC gloves and a full face respirator should be worn, ensuring the respirator has a combined dust and gas cartridge, for example an A1B1E1. This is particularly important when opening the drum of bait as high concentrations of phosphine gas can be released.
Always open the drum in a well-ventilated area to allow gasses to disperse.
Clean-up
At the completion of work with zinc phosphide bait:
- wash hands thoroughly;
- wash used gloves and respirator with detergent and water at the end of each day;
- wash out any calibration buckets or measuring vessels before storing.
Storage
- Keep the supplied sealing lid on mouse bait when storing, as this prevents moisture from the air affecting the zinc phosphide bait coating.
- Store drums of unused bait in a cool spot in your chemical shed to ensure high temperatures do not impact bait efficacy.
More information
Phone Ben White on 0407 941 923
Monitoring and baiting mice
Know your mouse numbers
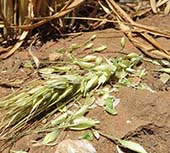
Growers should monitor paddocks to get an accurate idea of their mouse problem as numbers can vary significantly within a district. Monitor by walking a transect of 100 metres across the crop and counting active holes in a 1 metre wide strip (gives an area assessed of 100 square metres). Pull back stubble to check closely for mouse activity. Repeat a number of times across the paddock.
Active holes can be identified by sprinkling talcum powder around holes and inspecting the level of disturbance the following morning. One burrow per 100 square metres equals 100 burrows per hectare, or 200 mice per hectare. Burrows usually contain 1 to 4 mice but can have up to 40 mice.
Checks should be made across a paddock as populations can be patchy. Hole counts vary by soil type. In cracking soils, holes may be difficult to identify. In sandy soils, mice may dig many holes in search of seed, which can look similar to nesting burrows. In hard-setting soils, there may be few holes but each can contain many mice – up to 40 per hole during plagues.
Mouse chew cards (a template and instructions can be downloaded from here) are most reliable for gauging numbers in late autumn/winter when food is scarce. They are less reliable as crops mature, because the crop provides a more attractive food source than the oil-soaked card.
- Each sampling area requires 10 pieces of strong paper or light card (10cm by 10cm), marked with a 1cm grid and soaked in canola or linseed oil.
- Place the cards randomly across a paddock and peg them to the ground.
- If more than 10 squares per card are eaten overnight, significant mouse populations are emerging.
- If more than 20 squares per card are consumed in immature crops, there is a significant mouse problem.
Economic damage is likely when there are 200 to 300 mice per hectare at sowing (1 to 2 active burrows per 100 m transect) and baiting is critical. Two hundred mice per hectare can eat 1 per cent of the crop sown each night, or 14 per cent in two weeks.
When and how should I bait?
Aerial or ground application can be used to spread zinc phosphide bait. A rate of 1kg/ha provides 20,000 lethal doses per hectare. It can be spread in stubble, pasture and crop, or a vegetative fallow, but not on bare ground.
Baiting is less effective when alternative feed sources are available, so growers should endeavour where possible to clean up grain spills, control weeds and reduce food sources (eg graze sheep on stubbles).
A wide range of baits are registered for use in bait stations, in and around buildings and farm storages (within 2m) or enclosed spaces, e.g. drains. Consult the APVMA for a complete listing of currently registered products.
Ideally, mouse bait should be used in dry conditions to achieve maximum ingestion. Baiting at the time of sowing, or within 24 hours, is most effective for protecting recently sown crops. Damage is most severe for about two to three weeks after crop emergence and again around seed-set.
How many applications of bait are required?
Monitoring is the only method of establishing if further baiting is required. After baiting, mouse activity should continue to be monitored and rebaiting should not occur for at least 14 days. After 14 days, reassess mouse activity and if numbers remain high then reapply.
Proactive mouse baiting programs involve controlling numbers up to six weeks prior to planting. If numbers persist, then baits can be reapplied at sowing.
Zinc phosphide bait will tolerate some rain, but rain action erodes the bait quality, so rebaiting may be required if rainfall occurs within 1-3 days of baiting.
Useful Resources
- YouTube video: GRDC Mouse Control webinar
- Q&A from webinar on 28th of March
- GRDC Tips and Tactics: Better Mouse Management
- MouseAlert website
- GRDC Update Paper: Monitoring Mice in Australia
- Ag Excellence Alliance: Controlling Mice - Baiting Strategies
- YouTube video: Mice Control - a challenge for conservation farming
- GRDC Mouse Chew Card (PDF 2.8 mb) or GRDC Mouse Chew Card (JPG 0.6 mb)
- YouTube Series playlist: Mouse Control: Practical tips on baiting set-up, 5 part series
GRDC Research Codes
IAC00002 CSP1806-017RTX CSP1804-012RTX CSP1806-015RTX DAW1904-009RTX CSP1908-002RTX
Disclaimer: Any recommendations, suggestions or opinions contained in this publication do not necessarily represent the policy or views of the Grains Research and Development Corporation. No person should act on the basis of the contents of this publication without first obtaining specific, independent, professional advice. The Corporation and contributors to this publication may identify products by proprietary or trade names to help readers identify particular types of products. We do not endorse or recommend the products of any manufacturer referred to. Other products may perform as well as or better than those specifically referred to. The GRDC will not be liable for any loss, damage, cost or expense incurred or arising by reason of any person using or relying on the information in this publication.
CAUTION: RESEARCH ON UNREGISTERED PESTICIDE USE
Any research with unregistered pesticides or of unregistered products reported in this document does not constitute a recommendation for that particular use by the authors or the authors’ organisations. All pesticide applications must accord with the currently registered label for that particular pesticide, crop, pest and region.
Was this page helpful?
YOUR FEEDBACK